
- Age: 8+
- Time: 30
- Setup: 5 min, Activity: 20 min, Cleanup: 5 min
- Materials: $15
Put your construction skills to the test as you race against time and try tricky challenges to build candy crystals!
Download PDF- what you need
-
What To Do
WHAT TO DO
This activity explores different variations of a process scientists use to build a crystal material. To model this, candy will be used to represent atoms. Atoms are the tiny building blocks that make up everything around us.
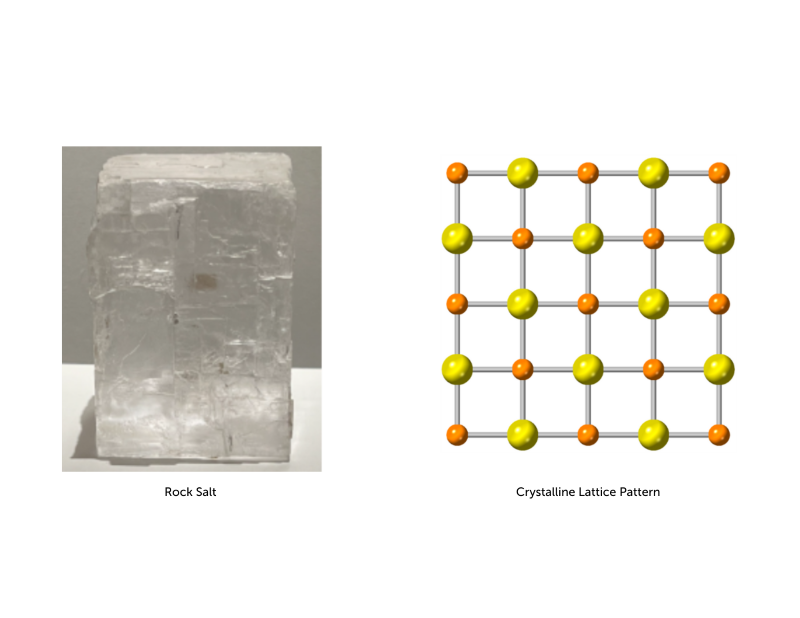
The example crystal structure you will be modeling is commonly called “rock salt,” and it is made from two different kinds of atoms. Below is a picture of what a small rock salt crystal looks like up close. Now imagine zooming in and slicing it into a layer that is one atom thick. If you did, you would see that the atoms in that layer form a crystalline lattice pattern shown in the diagram on the right. This is the structure that you will build.
Stage 1: Initial Crystal Build
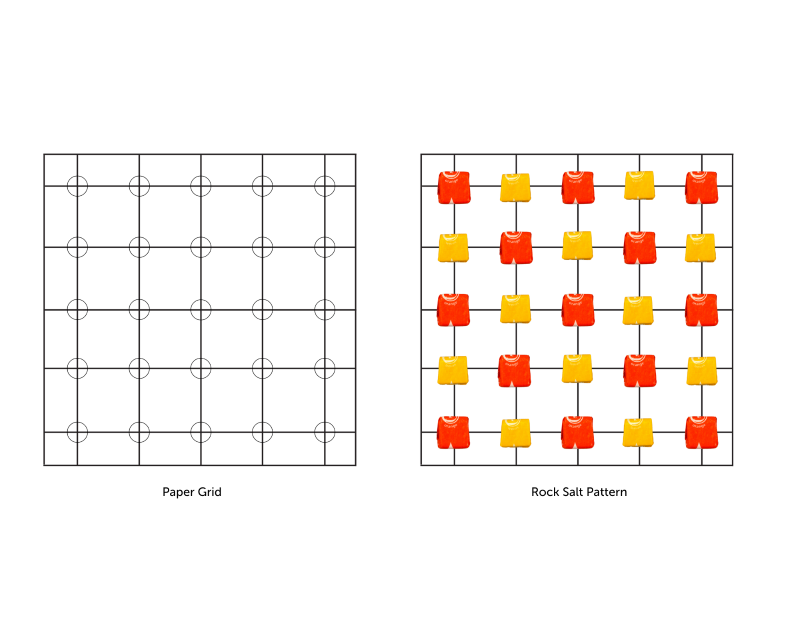
- Set the paper grid in front of you to guide your construction. Place the two colors of candy in separate piles off to the side. These are the "atoms" you will use to build your rock salt.
- Get your stopwatch ready and GO! Time how long it takes you to carefully construct the rock salt model.
- Be sure each candy atom covers the small circle at each intersection point.
- Refer to the diagram below to ensure your crystal structure matches the correct pattern. Your goal is to try to build this exact same structure for each method in Stage 2.
- On the Data Sheet, record the time it took to build your rock salt crystal. Take a picture of your final result for reference in the next challenges. Clear the candy atoms from the lattice and place them back into their original piles.
Stage 2: Experimenting with Different Build Conditions
Now try to build the same rock salt crystal structure using a variety of different conditions - just like materials scientists do! As you experiment, some of your atoms might not land in the right place. At the end of each round, count these misplaced atoms. In real crystals, these are called "defects."
For each and every build, be sure to:
- Use a stopwatch to measure your build time and write it on the Data Sheet.
- Keep each atom where it lands. Once your fingers let go of a candy piece, do not move it. You'll learn why this is important...And also part of the fun!
- Take a picture of each finished structure so it can be used for reference later.
- Count the number of defects. (Scroll down to see the Scoring Guide at the bottom of the page.)
- Put your candy atoms back in their original piles before starting the next round.
- If you have two people and enough supplies, build at the same time and have a friendly competition!
- Getting Energized: Build the structure as fast as possible.
- Add speed to your building process! Scientists sometimes use methods to build materials very quickly, too.
- What was your time? How many defects did you have? Record your results on the Data Sheet.
- Slowing Things Down: Place one hand behind your back and recreate the same structure using a one-handed method.
- Scientists sometimes choose to build materials using methods that give them more control. Why do you think that is?
- Was your strategy the same as when using two hands? How do your build time and number of defects compare?
- Dropping In: Drop each piece of candy from about 6 inches above the grid. Observe how the candies land and try again to make the same rock salt structure.
- Scientists can't always control exactly where each atom goes, but they do their best with the tools and methods they have.
- How well can you control the landing location of each candy atom? What do you notice about the spacing between atoms? Did you use any strategies that helped?
- Going in Blind: Close your eyes and build the structure.
- Because atoms are so small, scientists can't see how and where they travel when a material is being created. This build method mimics the non-visible aspect of making real materials.
- Plan how to build your material without using sight, and try it out. Don't peek!
- Total Chaos: Gather all the candy into your hands. Dump it on the mat at once.
- No need for a stopwatch here (the time is ~0 seconds) but take a picture and compare the result to the other build methods. How would you count defects here? Is it even possible?
- Sometimes, the easiest way for materials scientists to start the building process is to gather all the atoms together, and then gradually rearrange them.
- Questions to consider. Look at your photos and Data Sheet. Compare the time and number of defects in each method.
- What did you notice about the number of defects in the various build conditions of Stage 2? Which method had the most? Which had the least?
- How did the number of defects compare to the time each one took to build?
- How did the number of defects compare to the level of control you had in placing atoms?
- Did certain methods tend to have particular types of defects?
- Did you discover any strategies for making fewer defects in any of the approaches?
These are questions materials scientists ask themselves after making a new material, too!
Clean-up:
Enjoy a piece of candy or two. Collect all candies and return them to their containers. Clean the work area and store the equipment properly.
Scoring Guide
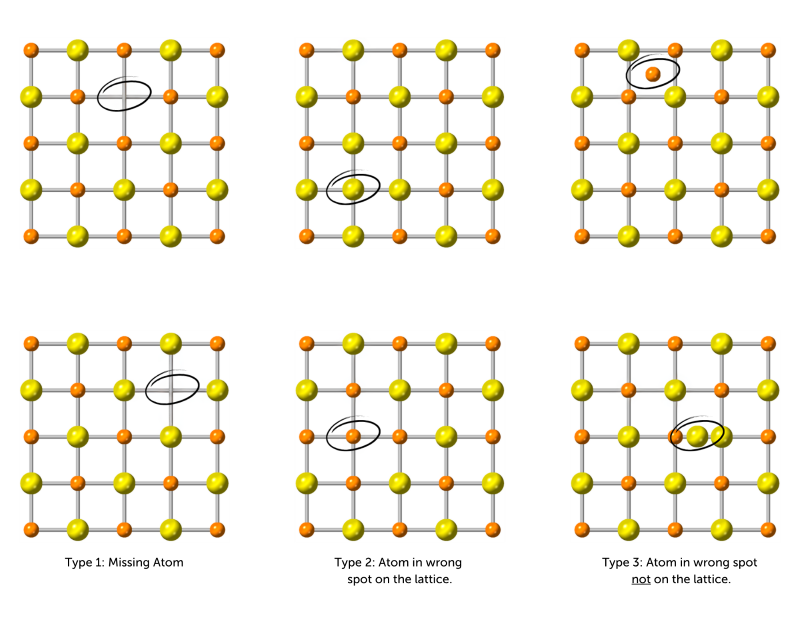
There are three types of situations where atoms find themselves misplaced from their intended location on the crystal lattice. These are called "defects."
Type 1: An atom is missing from its spot on the grid.
Type 2: An atom is in the wrong location on the alternating crystal lattice pattern.
Type 3: An atom is not in its proper location on the lattice.
After each build in Stage 2, look at your crystal structure to see how many times there is a match to one of these types. Count each example found as 1 defect.
- What's Happening?
-
So What?

Image credit: Adobe Stock
SO WHAT?Finding defects in predictable crystal patterns is a great way for scientists to learn about materials, but it’s also important for developing new technologies. For some applications, like materials used for computer memory, having very few defects is best. But defects aren’t always bad.
Scientists often want to add defects to a known structure to help produce a property they want. For example, steel is a material that needs to be extremely strong and rigid for many uses, but it also has to be bendable without cracking. Different methods and conditions for making steel change the arrangement of atoms inside, resulting in different properties of steel that can be used for everything from construction beams to washing machines.
-
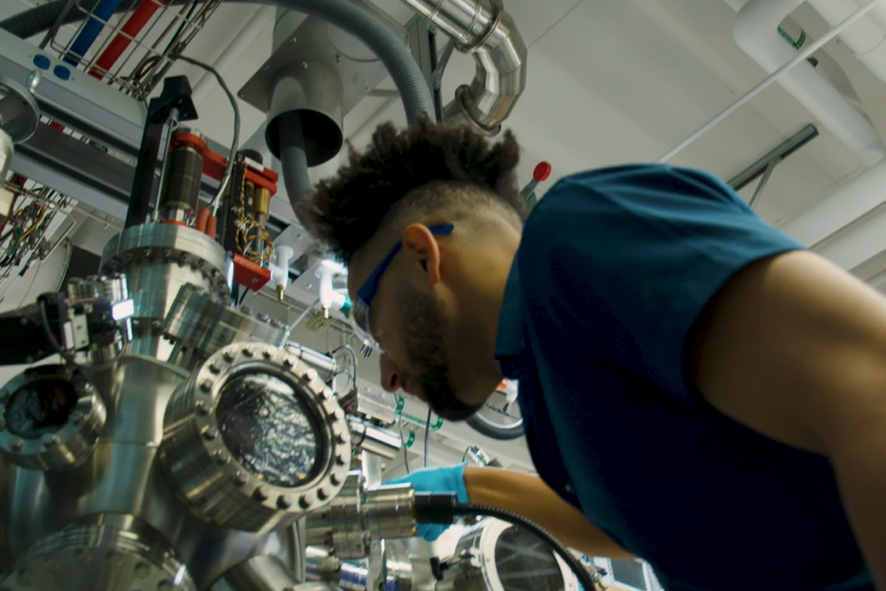
Scientists In Action
Scientist in Action
Using plasma, scientists grow thin film crystals and use really cool equipment to study how tiny defects are made. In the process, they unlock new properties and even design entirely new materials. Meet Ben DeBastiani, Nathan McIlwaine, and Nestor Marquez Rios as they explore how to make these discoveries possible.
- For Teachers